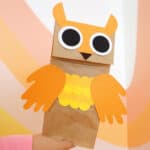
Paper Bag Puppet - An Owl Craft
Make this owl craft with just a a brown paper lunch bag and a few supplies you probably already have! Kiddos will love it because their handprints will be used for the wings!
Servings: 1 puppet
Cost: $2
Equipment
- 1 circle punch set or you can just cut out circles with scissors and a circle template is helpful for that
- 1 pair of scissors
Ingredients
Instructions
- Place your flat brown paper lunch bag so the folded bottom flap is facing up. For the face, cut a triangle of paper that fits the width and height of the folded bottom flap. Color the tip of the triangle to be the nose with a black or brown marker.
- Punch a 2" circle of the same color (or just cut a circle about 2" wide) and then cut that circle in half for the ears. Tuck the half circles under the wide end of the triangle and glue the ears and face in place.
- Punch or cut two white 2" circles to be the eyes (or you can use yellow paper for yellow owl eyes) and then smaller 1.5" black circles for the pupils. Glue on the white circle and then the black on top.
- Trace the child's closed-finger handprint onto a folded piece of wing paper and cut out the handprint so you have two handprints. Set aside.
- To make the feathers you can either draw them on with a marker by drawing lines of scalloped waves, or you can punch or cut 1" circles and glue them on one line at a time (starting with the bottom row) and overlapping the rows so they look like feathers.
- Now you can glue on your handprint wings and when the glue is set your puppet is ready to use!